
Understanding Laser Parameters
Our laser marking machines are used for quick clean and crisp marks on your products and belongings. Setting up a laser can be confusing at first but once you get the hang of it you can set up various kinds of designs, fonts and images quickly. Different variations and setups exist for laser markers, but let’s start with the basics.
Distance
The distance from the laser head to the object you are marking is one of the most important parts when using this machine. The Lens needs to be set around 170mm from the object you are marking. This number is not exact but starting at this distance and playing with it will eventually get the mark you think looks best. There is no correct distance, it is dependent on how you want the mark to appear on the object you are marking.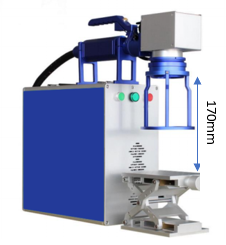
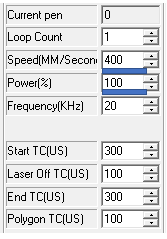
Power
The power of the lasers works taking into consideration the distance and the material that is being marked. The percentage power will change depending on the Watt of the laser, but for simplicity, we will base everything on a 20Watt laser.
When trying to find the ‘right’ mark for you, starting at 100 is a good place to begin. How the mark turns out is completely subjective to the person who requires the product.
Speed
Once you have started testing how the mark turns out, lower the power until you have found the colour and depth you want. These variables can also depend on the speed of the laser. I personally recommend starting at around 400mm/s. Turning the speed up will make the mark lighter (less deep) and slowing the speed down will make it darker (deeper).
Just remember. These settings are not the must-have settings. These settings are what we use as a midpoint of reference. Over time you will start to understand the distance and what speed and power work for you.